There’s a particular magic to running in winter that treadmill miles can never replicate. The air bites your lungs with crystalline sharpness. Your footfalls crunch through fresh snow in a rhythm that feels almost meditative. The trails are yours alone because everyone else stayed home. And when you finish, the sense of accomplishment doubles, you didn’t just run, you ran when conditions demanded you stay inside.
But winter running requires more than motivation and a tough mindset. It’s a technical discipline where small mistakes, a slip on black ice, wet cotton against your skin, an exposed patch of flesh in wind chill, can end your season or worse. Every year, runners suffer preventable injuries from falls, frostbite from improper layering, and hypothermia from underestimating how quickly conditions change when you’re wet and the wind shifts.
The good news is that with proper preparation, you can maintain your mileage straight through February. The runners who train through winter emerge in spring with an aerobic base and mental resilience that fair-weather joggers simply cannot match. Here’s your complete guide to running safely and effectively when temperatures drop below freezing.
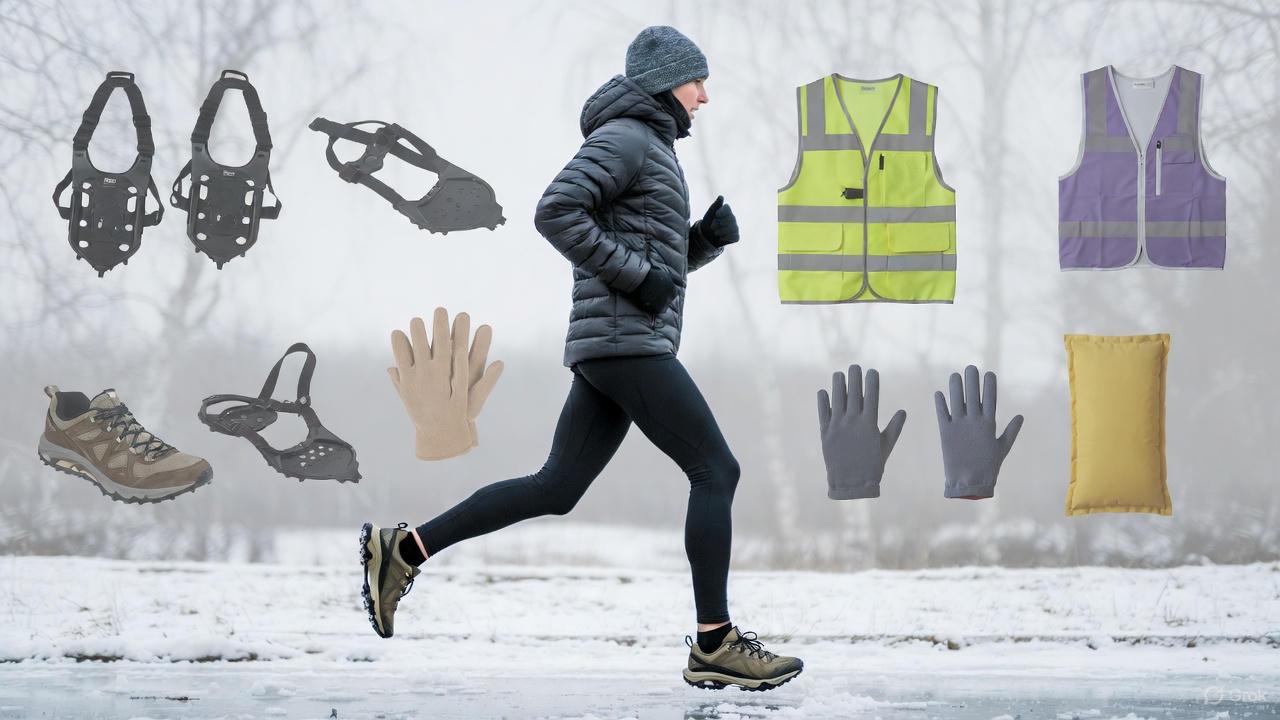
Traction: The Non-Negotiable Foundation
The single greatest risk in winter running is falling. A slip on ice can result in concussion, hip fracture, torn hamstring, or sprained ankle, injuries that sideline you for months. Standard road running shoes become dangerously slick in cold conditions because the rubber compounds designed for grip at room temperature harden below freezing and lose traction.
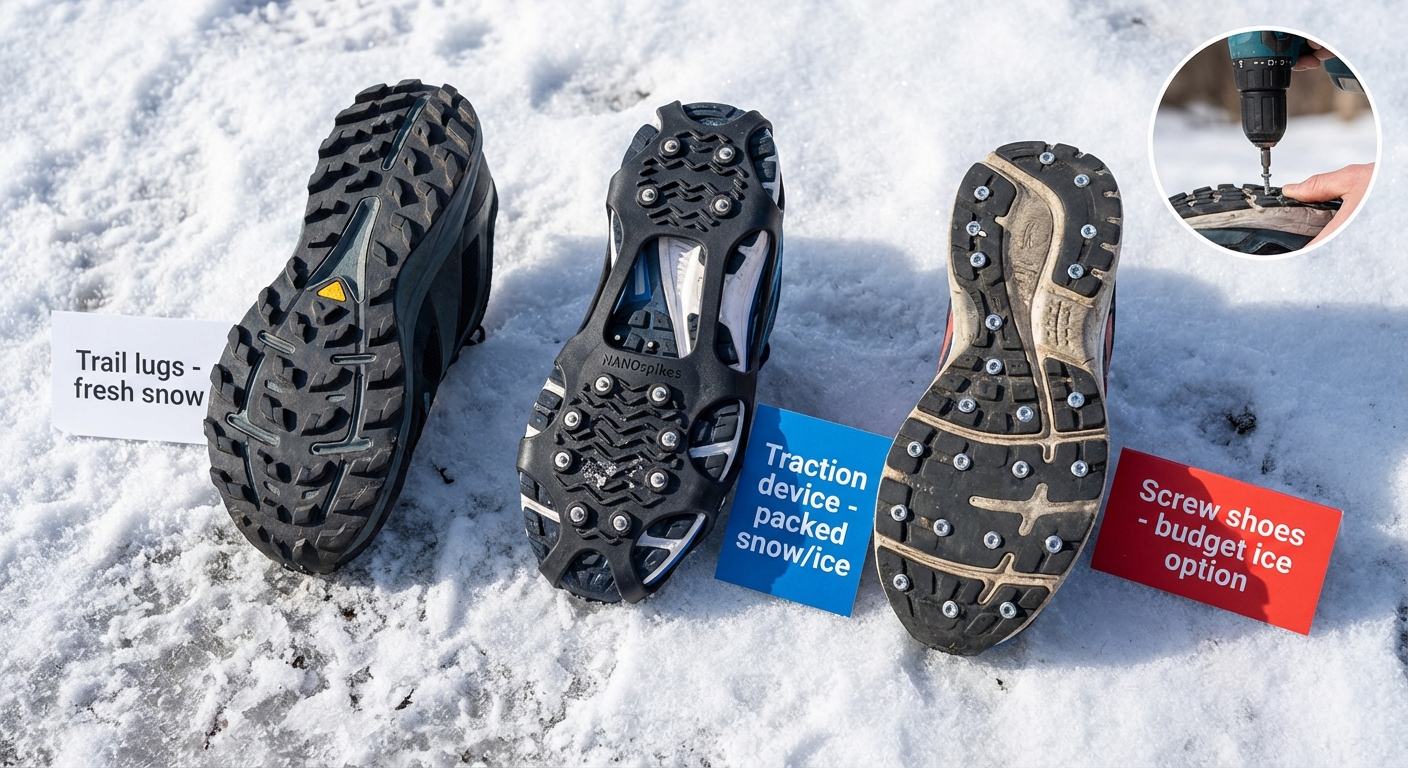
For fresh, unpacked snow, trail running shoes with aggressive lugs (5mm or deeper) provide adequate grip. Look for shoes specifically designed for winter with softer rubber compounds that maintain flexibility in cold temperatures. Brands like Salomon, Altra, and Inov-8 offer winter-specific models. The lugs should be multidirectional to handle varied terrain and spaced to shed snow rather than pack it.
However, once snow compacts into ice or you’re dealing with mixed conditions, rubber alone isn’t enough. You need metal contact points.
Traction devices strap over your existing shoes and provide carbide or steel studs that dig into ice. The two leading options for runners are Kahtoola NANOspikes and Yaktrax Run. The NANOspikes feature tungsten carbide studs that last longer and grip harder on solid ice. The Yaktrax Run uses coiled steel with a toe plate, offering good traction with more flexibility. Either is a significant upgrade over bare rubber, and serious winter runners consider them essential safety equipment rather than optional accessories.
The Screw Shoe Hack offers a budget alternative that many ultrarunners swear by. Purchase 3/8-inch hex-head sheet metal screws and install approximately 10-12 into the thickest rubber portions of an old pair of running shoes, concentrated under the ball of the foot and heel. The hex heads act as improvised spikes, providing remarkable grip on ice for under five dollars. This approach works best on older shoes you’re willing to sacrifice, as the screws do create small holes. Replace them when the hex heads wear smooth.
The Layering System: Be Bold, Start Cold
The most common mistake new winter runners make is overdressing. If you’re warm and comfortable standing in your doorway before a run, you will be overheating within ten minutes. The rule is “be bold, start cold.” You should feel uncomfortably chilly for the first five to ten minutes of your run, knowing that your body’s heat production will bring you to comfortable temperature as you warm up.
Overdressing leads to sweating, and sweating in winter creates dangerous problems. Moisture against your skin conducts heat away from your body approximately 25 times faster than dry air. A soaked base layer in 20°F weather can lead to rapid heat loss and hypothermia risk, especially if you stop moving or turn into the wind.
Fabric choice is critical. Cotton is the enemy. It absorbs moisture readily and retains it, losing virtually all insulating properties when wet. A cotton t-shirt soaked with sweat becomes a heat-sucking compress against your skin. This is how hypothermia happens to runners, not from cold air, but from wet fabric against skin combined with wind or stopped movement.
Merino wool is the gold standard for base layers. It regulates temperature effectively, wicks moisture away from skin while retaining warmth even when damp, and naturally resists odor-causing bacteria. A lightweight merino base layer (150-200 weight) works in temperatures from 40°F down to single digits depending on your layering strategy. The initial investment is higher than synthetic, but quality merino lasts for years.
Synthetic fabrics (polyester, polypropylene) wick moisture faster than wool and dry more quickly, making them excellent for high-output activities where you’ll sweat heavily regardless of conditions. The downside is they develop odor more rapidly and don’t retain warmth as well when wet. Many runners prefer synthetic for faster-paced workouts and merino for longer, steadier efforts.
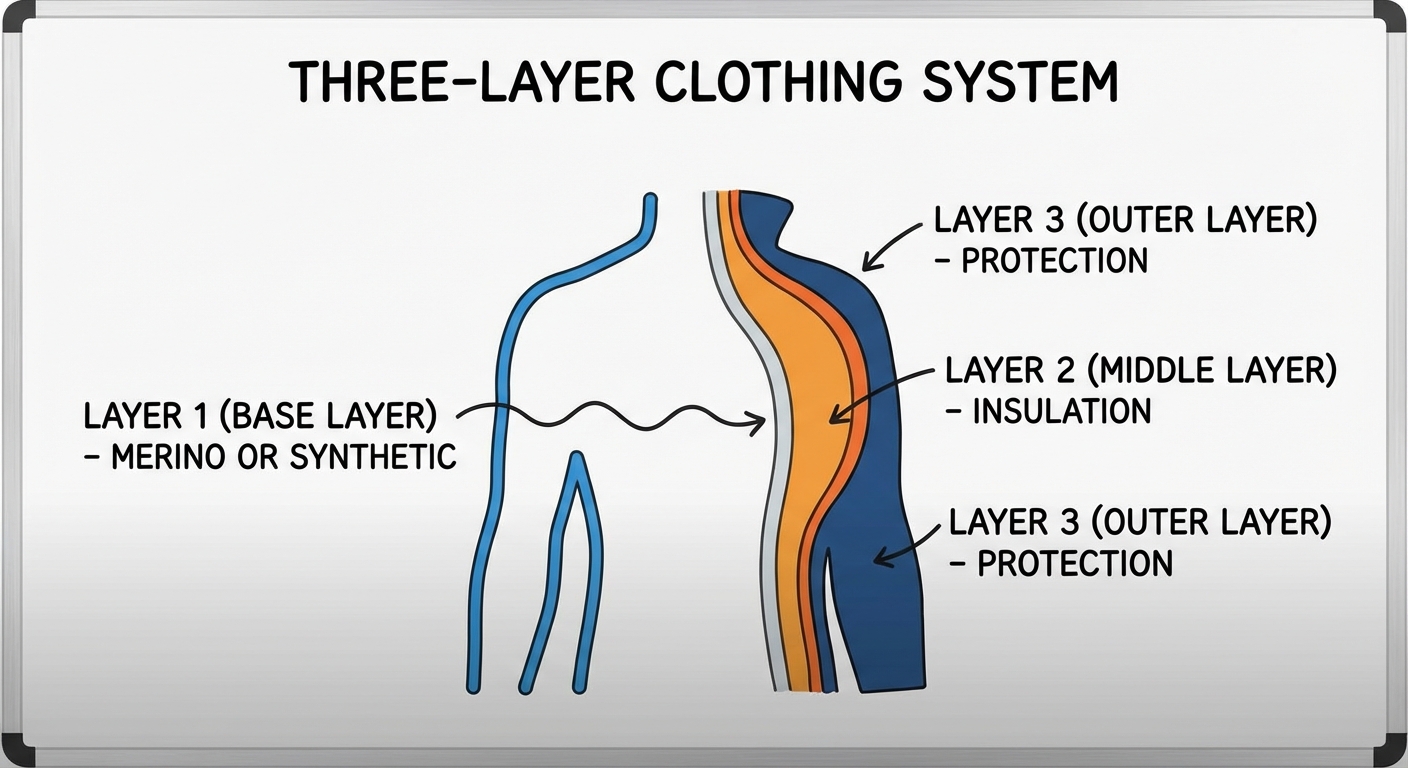
The three-layer system provides maximum versatility:
- Base layer: Tight-fitting merino or synthetic that sits directly against skin, pulling moisture outward
- Mid layer: Light fleece, grid fleece, or waffle-knit top for insulation (only necessary below ~25°F or for slower paces)
- Shell layer: Wind-resistant outer layer that traps the warm air your body generates while blocking wind
The shell layer is often the most important piece. A light windbreaker makes an enormous difference in perceived temperature because wind strips heat from your body exponentially faster than still air. Look for shells that are windproof on the front but breathable on the back to allow heat and moisture to escape. Avoid heavy waterproof rain jackets unless dealing with precipitation, as they don’t breathe well and cause overheating.
Wind Chill and Route Strategy
Wind chill calculations become critical in winter running because running itself creates wind. If you’re running at 8 mph on a calm day, you’re experiencing 8 mph of self-generated wind. Run into a 10 mph headwind and you’re facing 18 mph of effective wind chill. The National Weather Service wind chill chart shows that 20°F air temperature with 20 mph wind feels like 4°F, cold enough to cause frostbite on exposed skin within 30 minutes.
Route planning matters. The standard advice is to run into the wind for the first half of your route while you’re fresh, dry, and generating maximum heat, then run with the wind at your back for the return when you’re sweaty and fatiguing. Running with the wind while damp on the outbound leg and then turning into a headwind while wet on the return is a recipe for rapid, dangerous cooling.
Out-and-back routes work well for this strategy. Loops are trickier because wind direction relative to your path changes constantly. On loop routes, be aware of which segments will expose you to headwinds and plan your pacing accordingly.
Know your abort points. Unlike summer running where you can simply slow down if conditions deteriorate, winter running requires planning for the possibility that you may need to cut your run short. Know where you can duck indoors along your route. Carry your phone in an accessible pocket. If you feel numbness in extremities that doesn’t resolve with movement, or if you start shivering uncontrollably, stop immediately and get warm.
Warming Up Cold Muscles
Cold muscles and tendons are stiff and significantly more prone to strain or tear. The Achilles tendon is particularly vulnerable in cold weather because decreased blood flow to the lower leg reduces its flexibility and healing capacity. Rolling out of bed and immediately running hard in 20°F weather is asking for injury.
Warm up inside. Perform dynamic stretching in your house before heading out: leg swings (front-to-back and side-to-side), walking lunges, high knees, butt kicks, and calf raises. The goal is to elevate your heart rate slightly and get synovial fluid lubricating your joints before exposing them to cold. Five to ten minutes of indoor dynamic movement makes a measurable difference in how your body handles the first mile.
Start slow. Your first mile in cold conditions should be 30-60 seconds per mile slower than your normal easy pace. This extended warm-up period allows tendons and ligaments to reach working temperature gradually. Many running injuries happen in the first ten minutes when athletes push cold tissue too hard. There’s no prize for running fast immediately, take the time to let your body adapt.
Extremities and Exposed Skin
Your body prioritizes core temperature over extremities. When cold, blood vessels in your fingers, toes, ears, and nose constrict to preserve heat for vital organs. This makes extremities highly vulnerable to frostbite, which can begin developing when skin temperature drops below 28°F.
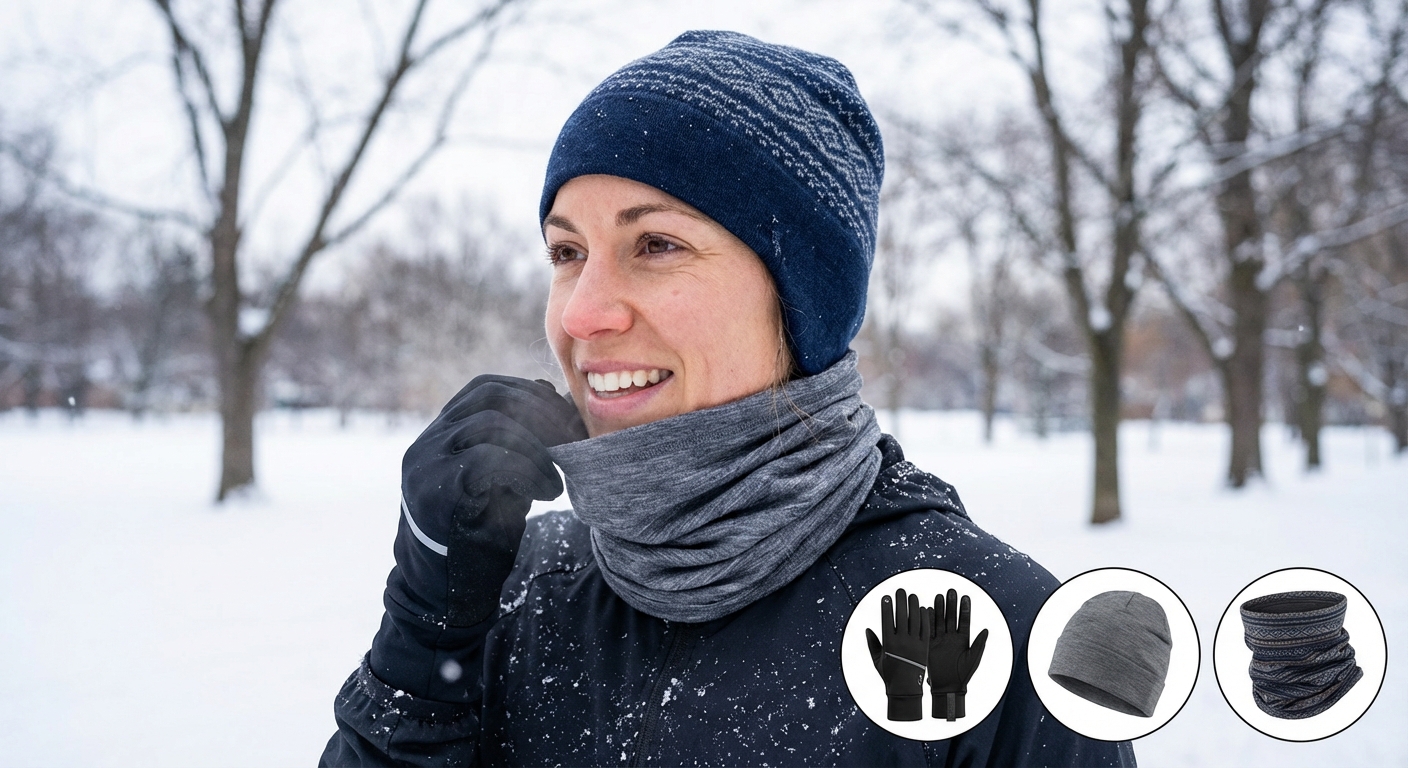
Hands: Running gloves or mittens are essential below 40°F for most people. Mittens retain heat better than gloves because fingers share warmth, but gloves allow better dexterity for adjusting gear. Many runners use lightweight gloves for moderate cold (30-40°F) and switch to mittens or layered systems below that. In extreme cold, consider “lobster” style gloves that group fingers in pairs, combining warmth with some dexterity.
Head: You lose significant heat through your head, but the old claim that you lose “40-50% of body heat through your head” is a myth. You lose heat proportional to exposed surface area. However, keeping your head warm does help your body maintain core temperature and allows better blood flow to extremities. A thin merino beanie or running cap with ear coverage works for most conditions. In extreme cold or wind, a balaclava protects face and neck.
Face and neck: Wind hitting your face creates the most immediate discomfort in winter running. A neck gaiter (buff) that can be pulled up over nose and mouth provides adjustable protection. Breathing through fabric also warms and humidifies air before it hits your lungs, reducing the bronchospasm that some runners experience in very cold conditions.
Check for frostbite signs: White or grayish-yellow patches on skin, especially ears, nose, cheeks, and fingertips. If you notice these, the affected area should be warmed immediately, but not rubbed (rubbing damages frozen tissue).
Visibility and Surface Awareness
Winter running often means running in darkness, as short days and work schedules push many runners into pre-dawn or post-sunset hours. Combine darkness with slippery surfaces and the consequences of a fall multiply.
Make yourself visible. Black leggings and a dark jacket make you essentially invisible to drivers. At minimum, wear reflective strips on moving parts of your body (arms, legs) where the motion catches attention. Better yet, invest in a lighted vest like Noxgear LightVest or similar products that provide 360-degree visibility. Active lighting (versus passive reflection) is visible from much greater distances and doesn’t depend on headlights hitting you at the right angle.
See where you’re stepping. A headlamp isn’t just for being seen, it’s for seeing. On uneven terrain or mixed surfaces, a headlamp lets you identify ice patches, uneven pavement, and obstacles before you step on them. Look for headlamps with adjustable beam width: narrow beams help see farther ahead, wide beams illuminate the ground directly in front of your feet.
Adjust your stride. On slippery surfaces, shorten your stride significantly and increase cadence. Keeping your feet closer to your center of gravity reduces the shearing force that causes slips. Think “shuffling” rather than “bounding.” This isn’t slow, it’s controlled. You can maintain good pace with quick, short steps while dramatically reducing fall risk.
The Cold Weather Performance Advantage
Beyond safety, there are genuine physiological advantages to winter training. Cold weather running is easier on your cardiovascular system because your body doesn’t have to divert blood flow to skin for cooling. Studies show that optimal running performance occurs at approximately 44°F (7°C), significantly cooler than most people prefer.
Running in cold conditions also builds psychological resilience. The mental toughness developed by training when conditions are uncomfortable transfers to racing and other challenging situations. You learn that discomfort is temporary and manageable, a lesson that helps you push through difficult moments in competition.
Finally, maintaining training through winter means you emerge in spring with your aerobic base intact. Runners who retreat to the treadmill or stop running entirely during winter months lose conditioning and spend the spring rebuilding rather than building. Consistent winter training positions you to peak when racing season arrives.
The Bottom Line
Winter running rewards those who prepare properly and punishes those who don’t. The difference between a transcendent experience on a snowy trail and a dangerous situation often comes down to equipment choices and awareness.
Treat traction as non-negotiable safety equipment, not optional gear. Learn the layering system and understand why cotton in cold weather is genuinely dangerous. Plan routes with wind direction in mind. Warm up properly before exposing cold muscles to intense effort. Protect your extremities and make yourself visible.
With these fundamentals in place, winter becomes an opportunity rather than an obstacle. The trails are empty, the air is clear, and every run feels like an accomplishment. The runners who embrace winter don’t just maintain fitness, they build the mental and physical foundation for their best performances when warm weather returns. Complement your running with cold exposure training and learn about walking for fitness on recovery days.
Your Next Steps:
- Assess your current gear – Do you have traction devices? Merino base layers? A windproof shell?
- Get traction devices – NANOspikes, Yaktrax Run, or DIY screw shoes before conditions demand them
- Learn the wind-first rule – Plan routes to face wind on the outbound leg
- Practice indoor warm-ups – Build a 5-minute dynamic routine you do before every cold run
- Start with shorter runs – Build confidence in winter conditions gradually
Sources: National Weather Service wind chill guidelines, American College of Sports Medicine cold weather exercise position stand, Journal of Athletic Training frostbite prevention protocols, Running USA winter running safety recommendations.